Astronomy > EXAM > Questions and Answers > Arizona State University AST 113 Lab 1. All Scenarios (All)
Questions and Answers > Arizona State University AST 113 Lab 1. All Scenarios
Document Content and Description Below
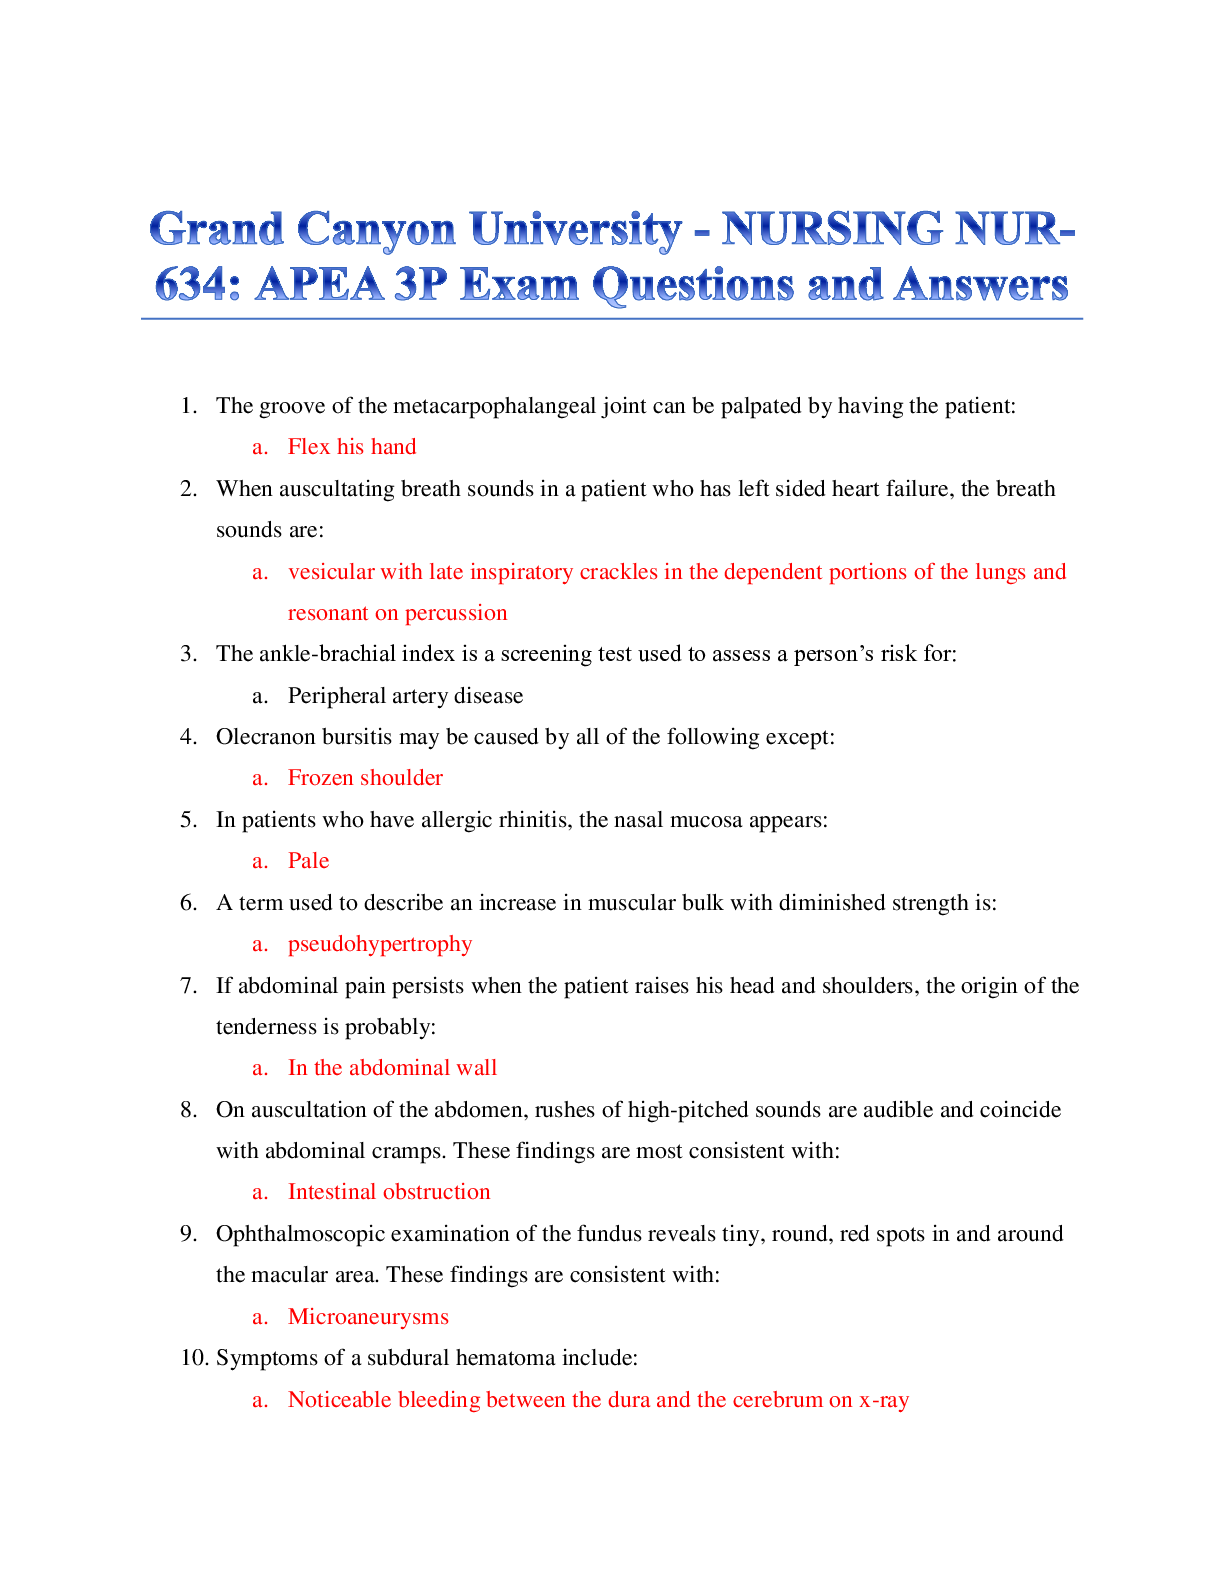
Arizona State University AST 113 Lab 1 Lab 1 · Question 1 1 out of 1 points Lab 1 Figure 1 Position We will start this lab by looking at position as it relates to astronomy. In the celestia ... l sphere model, Earth is stationary and the stars are carried on a sphere that rotates about an axis that points at the North Star. In Figure 1, two stars, A and B, are each shown at four different positions (1, 2, 3, and 4) through which each star will pass during the course of one revolution of the celestial sphere. In addition, your location on Earth in the Northern Hemisphere and the portion of the celestial sphere that is above your horizon are shown. Which of the following best describes the horizon shown in Figure 1? · Question 2 1 out of 1 points Based on Figure 1 (where the observer is located at the very top of the globe), which of the following statements is most accurate? | | · Question 3 1 out of 1 points According to Figure 1 (where the observer is located at the very top of the globe), in which position is Star A unobservable? | Question 4 | · 1 out of 1 points According to Figure 1 (where the observer is located at the very top of the globe), in which position is Star B unobservable? | Question 5 | · 1 out of 1 points When a star travels from a position below the observer’s horizon to a position above the observer’s horizon, the star is rising. e · Question 6 1 out of 1 points A setting star travels from a position above the observer’s horizon to a position below the observer’s horizon. · 1 out of 1 points Star A is just visible above your eastern horizon at Position 1. At which of the numbered positions is it just visible above your western horizon? | Selected Answer: | Position | 3 | | Correct Answer: | Position | 3 Question 8 | · 1 out of 1 points At which position, if any, does Star B rise and set? | Selected Answer: | No | Positions | | Correct Answer: | No | Positions Question 9 | · 1 out of 1 points Star B never sets. | | Tru e Tru e Question 10 · 1 out of 1 points Lab 1 Figure 2a - Click Image to Enlarge Lab 1 Figure 2b - Click Image to Enlarge Constellations This next section of the lab is about constellations. Given clear skies, there are some 6,000 stars visible to the unaided eye (without telescopes or binoculars). These stars are grouped into 88 constellations, often named after mythological characters and animals. On any given night, you can see only some of these constellations, depending on the time of night and your position on Earth. In this part of the lab, you will use the Starry Night software to learn about and answer questions related to constellations. You should have a general familiarity with Starry Night before attempting this portion of the lab. To become more familiar with Starry Night, access the tutorial exercise within the software. For this activity, set your date for January 1, 2014, and your location to Phoenix, United States. You should begin this activity at sunset. An easy way to do this is to click the drop-down menu to the right of the Time and Date field (on the control panel at the top of your screen just above the viewing pane) and select Sunset. Look toward the west by clicking the W viewing direction button located on the button bar across the top of your screen or by simply typing the letter W. The screen will pan toward the west. To view the constellations, select Options from the vertical menu on the left of your Starry Night screen. Scroll down to the Constellations menu (you can open or close the menu by clicking on the arrow to the left of the word "Constellations"). Select "Boundaries", "Labels", and "Stick Figures". Right-click (Control-click for Mac) any constellation on the screen—being careful not to hover directly over a specific star or object—then select the constellation. Explore the evening sky by clicking the directional buttons: N, S, E, W, and Z (for zenith). To look around, you can “drag” the sky by holding down the left mouse button and moving the mouse in a given direction. After you have explored the sky, answer the questions on this screen. For the purpose of these exercises, do not adjust the Zoom level because doing so could affect your answers. Use the Starry Night software to answer these questions. Which of the following constellations is visible when facing north? | | | | · 1 out of 1 points Click the "Stick Figures" under the Constellation tab in Starry Night to see the outlines of the constellations. Facing southeast, which constellation is shaped like whale? 1 out of 1 points Which direction are you facing if you can see the constellation Aquila? | Question 13 | · 1 out of 1 points Explorations of the Evening Sky In this part of the lab, we will explore the evening sky as it appeared on January 1, 2014. We use constellations as a way to identify where things are in the sky. For example, we may want to know where a planet is, or if a planet is in our current evening sky. Although named for a characteristic pattern of stars, each constellation represents a specific area of the sky. To explore the evening sky in Starry Night, click the Options tab on the left side pane and then click the plus sign (a gray arrow for Mac) to expand the constellations section. Check the boundariesbox to outline each constellation. Now click the Find tab on the left side pane and note which planets are not grayed out. These planets are up and viewable in your current evening sky. Double-click the name of a planet to identify and center the object on your screen. Check the box to left of the planet to label it in the sky. If you are having a hard time finding the labeled planet, click on the arrow left of the checkbox and select Centre to locate the planet in the sky. Explore your current evening sky by finding and identifying the planets or other objects such as satellites, asteroids, and comets that you see. Evening Sky—Altitude and Azimuth You can also describe the positions of each object in the evening sky by azimuth and altitude. The azimuth is given in degrees, as measured from north and turning clockwise. For example, north has an azimuth of 0 degrees. East has an azimuth of 90 degrees, south is at an azimuth of 180 degrees, and west is at an azimuth of 270 degrees. The altitude is also measured in degrees and represents the angular measure of an object above the horizon. In Starry Night, the azimuth and altitude can be estimated by choosing the Local coordinate system from the Gaze display drop-down menu across the top of your screen and referring to the degrees shown. You can also hover the pointer over the object of interest and read the precise azimuth and altitude values given. Note that the azimuth and altitude change with time, so always record the time when taking such readings. After you have explored the evening sky and the measures of altitude and azimuth, answer the questions related to the current evening sky on this screen. Don't forget: Make sure that your Starry Night settings are still set to just past dusk on January 1, 2014, from the Phoenix location. Use the Starry Night software to answer these questions. Facing west at sunset, which of the following planets is setting and no longer viewable? What is the altitude of Jupiter at 8:00 p.m. Mountain Standard Time (MST)? Note: If you are working from a time zone other than MST, you will need to adjust the time to the MST zone. · 1 out of 1 points In which constellation will you find the planet Neptune? · Question 16 1 out of 1 points Lab 1 Figure 3 - Click Image to Enlarge Evening Sky - A Closer Look at Planets Now that you have found the planets in the evening sky on January 1, 2014 and answered the questions, you can take a closer look at those planets in Starry Night by zooming in with the Zoomcontrol buttons at the far right of the control panel (click the plus sign to zoom in) or by right-clicking the planet (Control-clicking for Mac) and then selecting Magnify. To return to normal viewing, click the minus Zoom control button to zoom out as far out as you can. To learn more about a planet or object that you are viewing, click the information icon (i) to the right of the planet in the Find side pane. When you’re done, click the Find tab again to toggle back to a full-screen view. Lab 1 Figure 4 Lab 1 Figure 5 Lab 1 Figure 6 Motion The next part of the lab explores the motion of celestial objects. Starry Night is not used for this section of the lab. Imagine that you are the observer shown on Earth in the Northern Hemisphere, and that it is 6 p.m. Looking north, the sky will appear as shown in Figure 4. The positions and motions of the star in Figure 4 can be understood by imagining yourself as the observer at the center of the celestial sphere. In the celestial sphere model, Earth is stationary, and the stars are carried on a sphere that rotates on an axis that points at the North Star. Note that only the portion of the celestial sphere that is above your horizon is shown. The xs in both Figure 4 and Figure 5 represent four of the positions through which Star B will pass during the course of one revolution of the celestial sphere. In Figure 4, the position of Star B at 6:00 p.m. has been identified for you. Which position in Figure 5 corresponds to the location of Star B at 6:00 p.m. that was identified in Figure 4? · 1 out of 1 points The rotation of the celestial sphere carries Star B around so that it returns to the same position at about 6 p.m. the next evening. Given this information, at what time will Star B reach position 1 in Figure 5? · 1 out of 1 points Using Figure 5, which direction would you have to look to see Star B at 6:00 a.m.? · 1 out of 1 points Which position represents the zenith in Figure 5? · 1 out of 1 points Given the information presented in Figure 5, which of the following best describes the direction you would look to see Star A when it is halfway between rising and setting? Figure 6 shows an extended view along the eastern horizon showing the positions of Stars A and B at 6 p.m. The arrow shown is provided to indicate the direction that Star B will be moving at 6 p.m. Based on Figure 6, which of the following statements is most accurate? Rotation The final part of this lab explores the concept of rotation. For this section of the lab, you will use the Starry Night software. Make sure that you are still viewing just past dusk on January 1, 2014, from the Phoenix location. Look toward the west by clicking the W viewing direction button or by simply typing the letter W. The screen will pan toward the west. Select 300× from the Time Flow Rate drop-down list. Click the PLAY button to have time move forward; observe the motion. Click STOP after a few seconds of motion. Don’t continue the motion for more than a few seconds. Now look toward the east and click the PLAY button for a few seconds and observe the motion. After you have had a chance to explore, use the Starry Night software to answer these questions. When viewing west, in which direction do stars set? | When viewing east, in which direction do stars rise? | Which of the following statements is true regarding the rising and setting of stars? · Beginning at sunset and looking toward the east, click the Find tab to display the viewable objects in the evening sky. Advance time forward until one new object becomes highlighted (I recommend using 30x). Which object was the first to become highlighted (bolded) in the panel as viewable? · 1 out of 1 points What is the altitude of the object in the previous question when it first appears highlighted (bolded) in the left panel? · 1 out of 1 points Advance time several hours. Select the statement that most accurately describes what you observe about the object. Wednesday, O [Show More]
Last updated: 3 years ago
Preview 1 out of 13 pages
.png)
Buy this document to get the full access instantly
Instant Download Access after purchase
Buy NowInstant download
We Accept:

Also available in bundle (1)
Click Below to Access Bundle(s)
Arizona State University AST 113 ASTRONOMY Lab 1- Lab 14 All Scenarios <Questions and Answers>
Questions and Answers > Arizona State University AST 113 Lab 1. All Scenarios Questions and Answers > Arizona State University AST 113 ASTRONOMY Lab 2 Questions and Answers > Arizona State Unive...
By Kirsch 3 years ago
$49
14
Reviews( 0 )
$8.00
Can't find what you want? Try our AI powered Search
Document information
Connected school, study & course
About the document
Uploaded On
Aug 08, 2022
Number of pages
13
Written in
All

Additional information
This document has been written for:
Uploaded
Aug 08, 2022
Downloads
0
Views
410